Punjabi Aloo Matar Samosa
As an Amazon Associate and member of other affiliate programs, I earn from qualifying purchases.
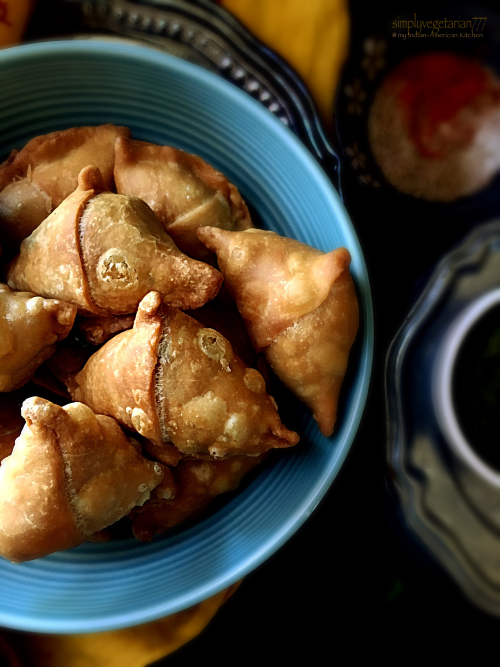
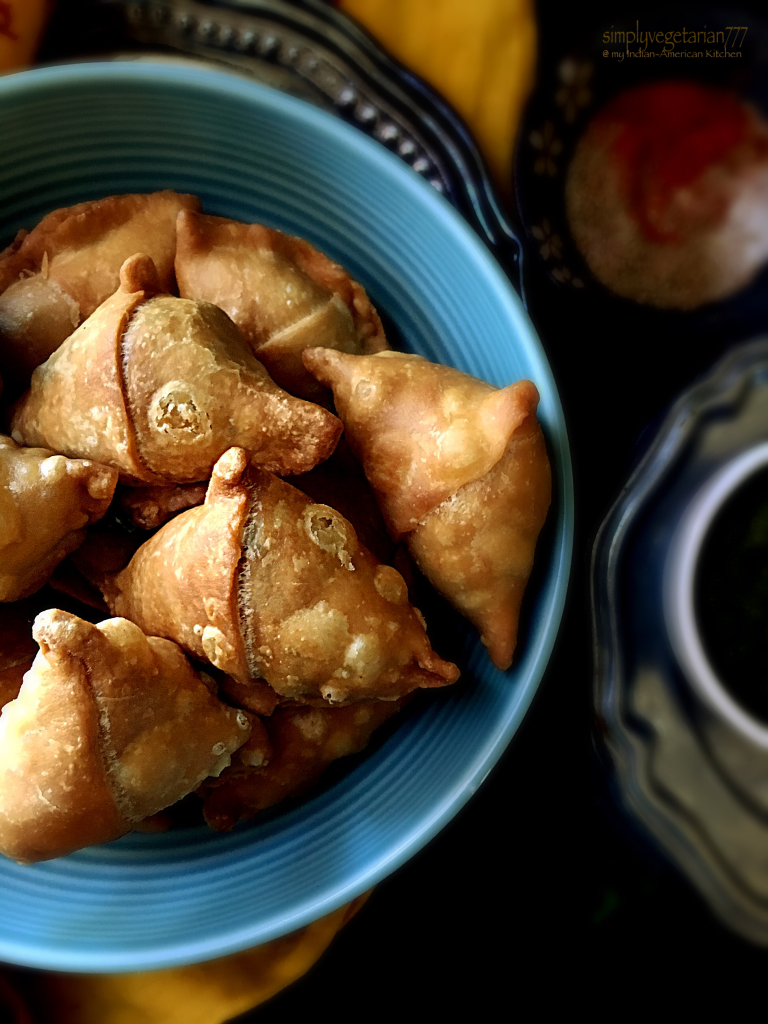
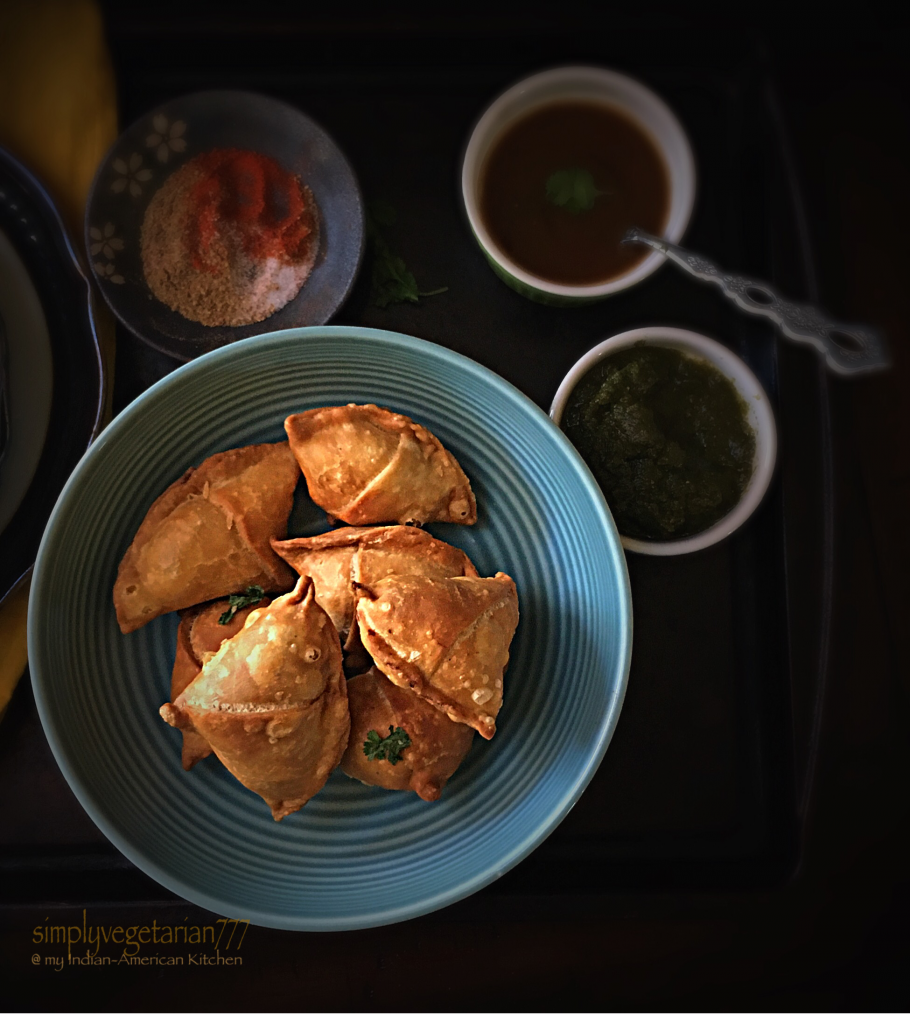
Punjabi Aloo Matar Samosa is one of the most popular samosa from India. Filled with Aloo(potataoes) and Matar(peas), it is a famous Street Food and Chaat delicacy. Many restaurants offer samosas in snack & appetizer section of their menu. Truth to be told, I can fill myself up with Samosa only, served with Green Coriander/Cilantro Chutney and some Khatti meethi chutney , sprinkled with chatpata chaat masala .
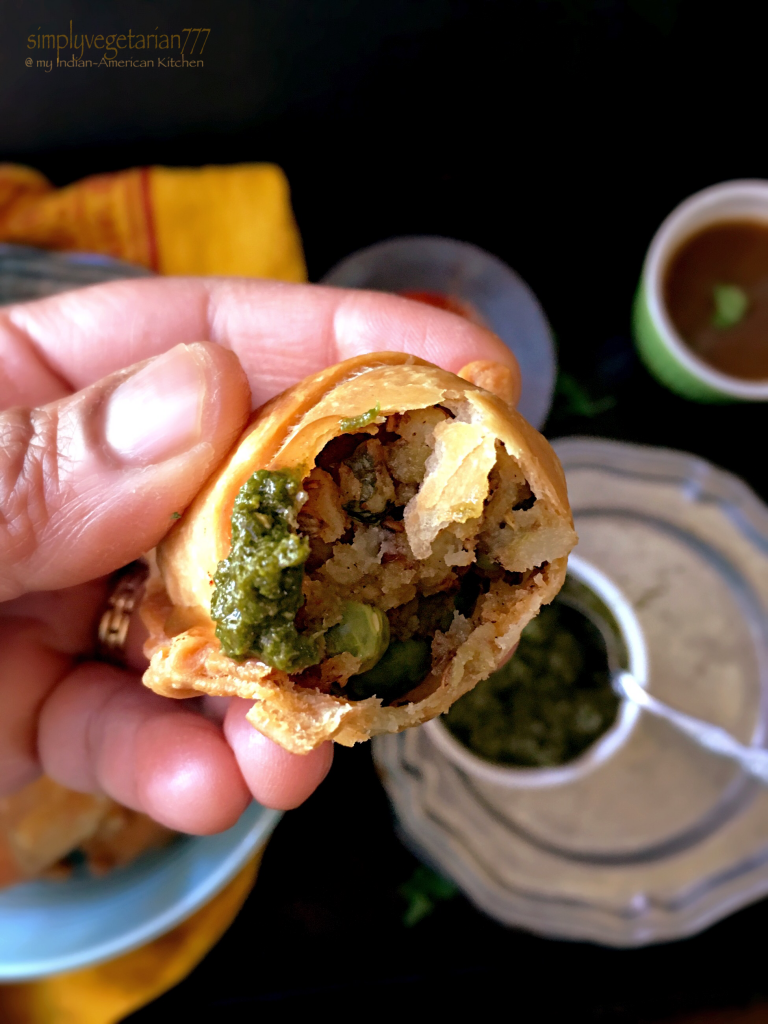
The crispy and flakey texture of samosa, the spicy and comforting aloo matar stuffing, the amalgam of chutneys, is a heaven created on a plate. Nothing, I mean nothing can beat this combinaion. Not only my Indian friends but American friends who are aware of the Indian food, will vouch for that. I have seen many of my American friends drooling over Samosa and Saag Paneer & Naan, big time.
In India, we were spoiled rotten with the availability of street foods and chaat, right around the corner. You just had to wish for samosa or kachori or chhole bhature, take a few steps and get to the delectable food in no time. Ah, I miss those days.
I never ever made made samosas at home before this because the process always scared me. It was Amit’s birthday yesterday and I wanted to surprise him with Samosa. I know he has a soft corner for the samosas. In the state of gaining courage to try my hands at samosa, I read many recipes online and one that stuck with me prominently was by Nisha Madhulika. I love watching her videos. The way she talks and teaches, connects me back to India. Do watch her video by clicking on the link above for more clarity, if my step by step pictures do not do justice and otherwise too :).

Amit and the girls mentioned that never ever are they going to eat samosas from outside. My oldest, Aanya said, “oh, so this is how awesome samosas taste, when they are made fresh”. That says a lot, since she requested me to make samosas often at home. ouch..
I am going to put the post in Sections for better understanding and convenience. The instructions are so detailed that even a kitchen rookie can make it. Do bookmark this post for a basic Samosa Recipe, since the measurements are just perfect.
Punjabi Aloo Matar Samosa Recipe
Kitchen Equipments Required – a deep mixing bowl or paraat, rolling board and rolling pin, a deep pan or wok to deep fry, a slotted spoon, a tray line with parchment paper to keep shaped samosas, a plate lined with paper napkins, a damp cloth, a knife, a small bowl filled with water, a frying pan to make filling, a stirirng spoon, a medium bowl and a spoon, a large “damp” kitchen cloth towel for covering the dough.
Yields – 12-14 Medium size Samosas
INGREDIENTS
DOUGH FOR THE SAMOSA
Refined Flour / Maida – 1 cup
Oil – 2 tbsp
Salt – 1/4 tsp
Water, Lukewarm to knead the dough, few tablespoons
PUNJABI FILLING FOR THE SAMOSA
Potatoes – 1extra large or 2 medium, boiled and mashed
Peas – 1/2 cup, thawed if frozen or parboiled if fresh
Ginger – 1 small piece, grated fine
Coriander/Cilantro leaves – 1 tbsp, finely chopped (tbsp = tablespoon)
Oil & Spices
Oil – 1 tsp (tsp = tea spoon)
Asafetida/Hing – a small pinch
Cumin seeds – 1/2 tsp
Coriander seeds – 1/2 tbsp
Red Chili powder – 1/4 tsp
Garam Masala – 1/4 tsp
Amchur/Khatai/Dry Mango powder – 1/4 tsp
Salt – 1/2 tsp or to taste
Oil for Deep Frying – peanut oil, preferable because of its good heating properties at high smoking point.
MAKING THE DOUGH FOR SAMOSA
- Add the flour, salt and 2 tbsp oil to a big bowl. Mix well with hands, it will have a bread crumb consistency.
- Start adding lukewarm water to the flour, a table spoon at a time and bring the flour together in a dough. We need a stiff hard dough (harder than the poori dough).
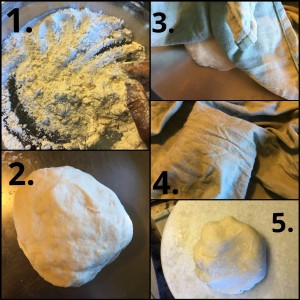
- Knead the hard tough dough for good 3-4 minutes, till pliable. See picture 2.
- Cover the dough with damp (not wet) kitchen towel and let rest for 30 minutes.
- The dough will be soft and more pliable to work with after resting for 30 minutes. See picture 5.
PREPARING THE PUNJABI SAMOSA FILLING
- Take the coriander seeds and crush them coarsely.
- Take the frying pan and heat 1 tsp oil in it. Add cumin seeds and hing/asafetida & reduce the heat.
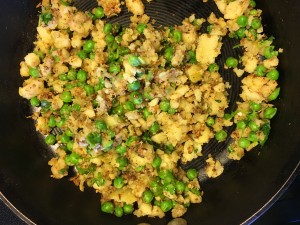
- Now add grated ginger, crushed coriander seeds and all the spices as mentioned under oil & spices and saute for few seconds on reduced heat.
- Add boiled and mashed potatoes, peas and coriander leaves. Saute on medium heat for 3-4 minutes. Take off the heat and transfer to a medium bowl and let cool to the room temperature.
SETTING UP YOUR WORK COUNTER FOR SAMOSA MAKING & FRYING
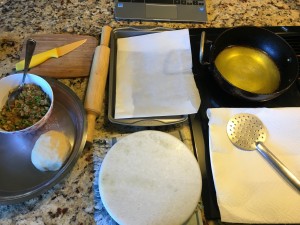
- Once the dough is rested for 30 minutes and the filling is cooled down to the room temperature, set up your work counter.
- Put the oil in the deep fryer or kadhai. Set your rolling board and pin. Set your tray to keep the shaped samosas and the plate with napkins where you will take out the fried samosas. Use the same damp cloth, used for covering the dough. Keep the knife to cut the discs by the side. Keep a small bowl filled with water to seal the edges by the side too.
- This way, you will have less over whelming experience. I am kind of a freak for a good order and control over my work.
- Now you are ready for rolling, shaping and frying.
ROLLING THE DOUGH FOR SAMOSA
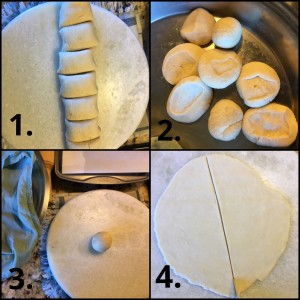
- Slightly grease your hands and stretch the dough out in a log of about 2 inches width. Make 6-7 equal cuts on the log. See picture 1.
- Separate the portions and flatten them out in flat discs. See picture 2.
- Take 1 disc and make a smooth round. See picture 3.
- Roll out a disc of about 5&1/2 to 6 inches diameter. It should not be super thin or super thick. Try to make as perfect discs as possible.
- Cut the disc into 2 equal halves with the knife. Now you have 2 samosa wraps in hand to shape and fill.
SHAPING & FILLING THE SAMOSA
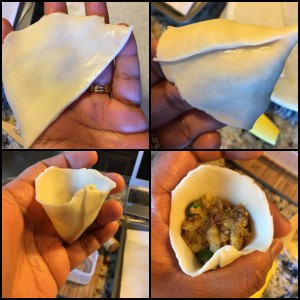
- Pick 1 half moon of the disc. Apply little water on the straight line side of the moon. See picture 1.
- Now make an imaginary half way point on the length of the straight line and bend one side to over lap the other side, to make a CONE-SHAPE. See picture 2 & 3.
- Pinch the top of the cone hard to make a pointy cone. Press hard along the cone meeting line from inside and outside to ensure no leakage while frying.
- Fill the inside of cone with cooled down filling, leaving at least 1/2 inch bare at the edges. DO NOT FILL TILL THE TOP. pat the filling down with fingers.
CREATING A PLEAT IN THE SAMOSA COVER
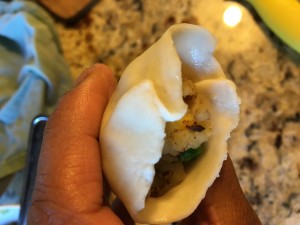
- This is a very important part of punjabi samosa for me. I see market bought “fresh” samosas in USA and I often think that these are just plain triangles, these are not samosas. Something is missing. The BACK PLEAT is missing and therefore those look triangles and not samosas.
- Once the Samosa is filled, We need to close it to fry. We may close the sides as is without this back pleat but this gives an authentic look.
- First run a wet finger all around the open base.
- This is how to do the pleat – you have to make the pleat on the base side, opposite to the cone seam, the point where you over lapped the sides to make a cone.
- Simply fold and make a small pleat at the back of the larger base side. press it tight.
- Now bring the front and back of the base together, pressing the edges tightly and closing the samosa to be fried.
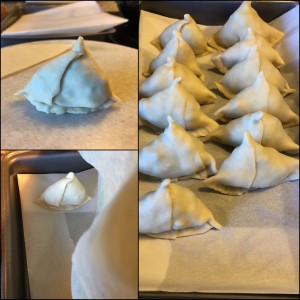
- Once finished shaping and closing the edges, make the samosa sit on its bottom and set aside on the tray lined with parchment paper.
- Cover the shaped samosa with the damp kitchen cloth.
- Likewise, finish all the dough balls and halving them and the filling and then sealing them.
- Cover all of them with damp cloth.
FRYING THE SAMOSAS
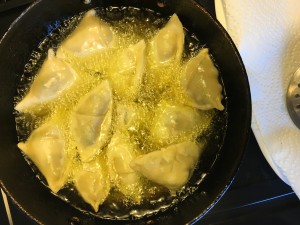
- Heat the oil in the deep frying pan or kadhai or a wok.
- To make sure that we have the khasta and flakey right textured samosas, the technique is to either over-crowd your frying pan or kadhai or to fry 4-5 of them together at a low heat.
- Mine is a medium size Indian Kadhai, I added 12 medium size samosas together to be fried. After adding the samosas, I brought the temperature down to the medium heat.
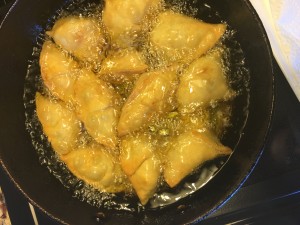
- I let them fry for about 7-9 minutes, till they turned golden pink.
- The temperature control is the key in frying the samosas, just like in Gujiya or Kachori.
- Your delicious Samosas are ready to be served with Hari Dhaniya ki Chutney and Khatti meethi chutney.
- They go very well with Chhole / Chickpeas curry.
STORAGE
- These are best served hot out of the kadhai or wok.
- You may make them in the morning and over warm them in the evening before serving.
- I ave never done this, but many times, I hear people make a huge batch of samosas and freeze them individually before frying. You may try that. Freeze them on a tray and then take them out once frozen and then store them together in a freezer friendly bag or box. When needed, take out few pieces, thaw slightly in microwave and deep fry.
Phew, what a long post, but I am sure that is going to prove to be a great tutorial for anybody like me who is a samosa making beginner ;).
Taking these SAMOSAS to Angie’s Fiesta Fridayco-hosted by Natalie and Hilda .
I had a fabulous time learning and making these samosas in my Indian American Kitchen. I am sure you will love it too. Home made is definitely better than the market bought ones.
Sonal
Wow! This is like a “new Samosa version, so mush detail.
This looks so delicious!
This is a wonderful post Sonal. It was a lot of work, but I could even make them now!
Yayyyyyy
Mouth watering!!!! Samosas are my weakness!
Mine too 🙂
Who doesn’t like a good samosa. The potato and pea are my favourite, as long as they are well spiced. Thanks for sharing the samosa love.
I knew you would love it Hilda when I saw your name in the co hosts
Awesome! I adore samosas. Now living in rural France, I can no longer buy them easily so will need to start making my own. Your recipe is beautifully detailed. Thanks, I will need that as the last time I tried, they all burst open in the oil. This is a definite try for me.
Thanks Nadia :).
Now you have a recipe to enjoy some home made
Thanks for visiting ❤️
Very eager to try.
Omg you’ve left me totally drooling…I wish I could grab them right off the screen. I love, love, love samosas…..sigh!
C with your skilled expertise now you an make them at home ❤️
Thank you
This looks soooo yummy! And you make it look fairly easy. My last attempts at making samosas haven’t been successful but I’ll give this a try. Thanks for another great post!
Thanks Shuchi ❤️
Wow! They look amazing, works of art!!! You did a great job, it was worth all of the work xxx
❤️
GORGEOUS!! These are absolute perfection. Love this descriptive post too. You’ve convinced me that I NEED to make them myself! 🙂
Oh Josette, you will enjoy the process and the eating these at home 🙂
Simply superb, Sonal. This is a no fail recipe. 🙂
hai na? I worked on it for 4 hrs…
Wow! This is like a “Making Samosa for Dummies” version, so mush detail. Kudos! They look super cute
You said it Apsara
Geez Sonal, you really went to town on this post. Well done, everything is so clearly shown. I cheat when making samosas and use the puff pastry dough as it turns out nice and crisp. They say to get a nice crisp you also need to incorporate rice flour in the dough. Yours look wonderful, I can only imagine your husband’s look on his face when he walked in the door. 🙂
Ah..never heard about the rice flour trick..but I can see the impact :).
Thank you so much Loretta ❤️
I love these Sonal and we had them all the time in Saudi! One of my favorites so a must try!! yumm
Thank you Lynn
I bet Saudi version of filled meat keema were fantastic too 🙂
They had potatoes, peas and were from Indian restaurants. So I have to try these!!
Oh ok 🙂
These are the most common version and you will surely like these 🙂
I am sure!